This is an old revision of the document!
Integration with External Tools
There are several ways to integrate TestOptimal with other systems and tools, allowing you to leverage your investment in the existing test automation tools. These interfaces are:
- Remote Agent - used by Java and Javascript/node.js above.
Cloud Services
You can run your testing on Selenium-based cloud service for cross browser testing and load testing with hundreds or even thousands of virtual users:
Please refer to their website for instruction on how to set up the connection to their service.
Requirements
Jira
- config.properties:
ALM.req.class=com.testoptimal.alm.JiraConnect
ALM.jira.auth.basic.username=xxx
ALM.jira.auth.basic.password=xxx
ALM.jira.auth.type=Basic
ALM.jira.req.query={"jql"\: "project \= @PROJECT@ and (issuetype \= Story or issuetype\=Task or issuetype\=Sub-Task) and status \= 'In Progress'", "fields"\: ["summary", "priority", "updated", "description"]}
ALM.jira.req.url=http\://xxx\:8080/rest/api/2/search
- IDE / Requirement / Parameters:
{ "project": "DEMO" }
Azure ALM
- config.properties:
ALM.req.class=com.testoptimal.alm.AzureConnect
ALM.azure.auth.basic.username=xxx
ALM.azure.auth.basic.password=ww6k...rj6klsvq
ALM.azure.auth.type=Basic
ALM.azure.req.url=https\://dev.azure.com/xxx/@PROJECT@/_queries?tempQueryId\=@QUERY_ID@
- IDE / Requirement / Parameters:
 {  "PROJECT": "Demo",
    "QUERY_ID": "a2ae7670-...-ff40d088e533"
 }
Authentication
Besides Basic, additional authentications are possible. Below is the list of authentication options:
- BASIC
- ALM.'xxx'.auth.basic.username
- ALM.'xxx'.auth.basic.password
- FORM
- ALM.'xxx'.auth.form.username
- ALM.'xxx'.auth.form.password
- OAUTH
- ALM.'xxx'.auth.oauth.consumer.key
- ALM.'xxx'.auth.oauth.consumer.secret
- ALM.'xxx'.auth.oauth.access.token
- ALM.'xxx'.auth.oauth.secret.token
- OAUTH2
- ALM.'xxx'.auth.oauth2.security.token
- ALM.'xxx'.auth.oauth2.signature
Jenkins
For current version v6, you would use REST API documented at http://localhost:8888/swagger.
For V5, add steps to Jenkins build job to run models remotely:
- Install HTTP Request plugin installed in your Jenkins
- Add admin to connect to Runtime Servers
- select menu Jenkins / Credentials
- click “(Global)” under “Domain” column
- fill out form and save
- open /create build job
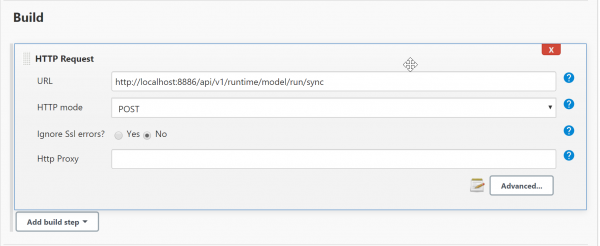
- add a build step with HTTP Request plugin
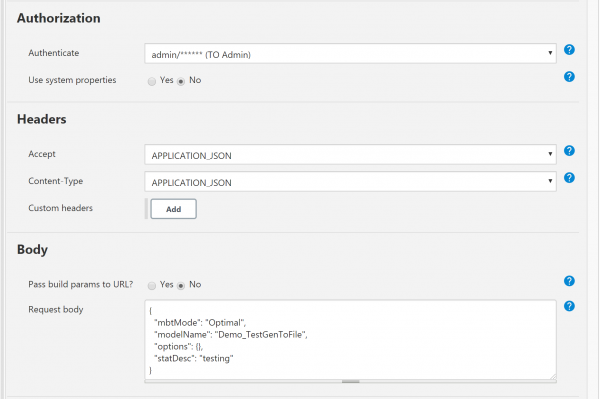
- click “Advanced” button and fill out form as follows:
- click “Save”
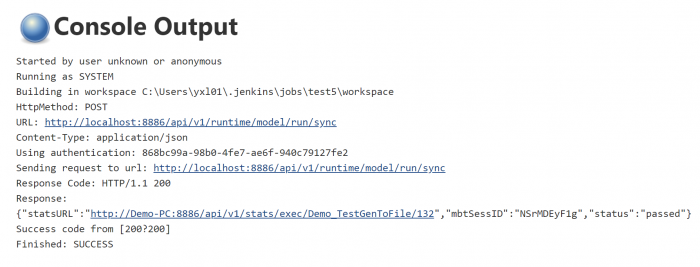
Run the job and you should see the output in Job Console Output:
Azure DevOps
Add a step to Azure DevOps to run models remotely using REST APIs.
REST APIs
TestOptimal provides a suite of REST APIs to allow 3rd party tools and applications to communicate with TestOptimal server.
You can use these REST APIs as documented at http://localhost:8888/swagger to access start and stop model execution, access model artifacts/files as well as perform system functions remotely.
Organization of REST APIs
REST APIs are grouped and organized in these categories (to match Swagger-UI):
- ALM - ALM source definition and model requirements
- Agent - TestOptimal Agent APIs: register remote agent and receive agent commands
- Client - TestOptimal Agent APIs: remote execute model and data set execution
- Dashboard - Dashboard data: KPI and model execution statistics
- Demo - REST API used by demo models
- File - access to model and system files
- Graph - generate / download graphs for model executions: model graph, coverage graph, traversal graph and test case graph (MSC)
- Model - access to model artifacts/files
- Report - Dashboard reports
- Runtime - start/stop model execution
- Security - user login
- Stats - model execution statistics
- SvrMgr - Server manager functions
- System - perform system functions
- web-redirect-controller - internal use
Security and Authorization
Most of the REST APIs are access controlled.
Basic Auth is used to authenticate users. It is highly recommended that you enable SSL if you access TestOptimal server from the internet to prevent your user id/password from being intercepted.
Swagger UI
Swagger UI is provided for your convenience. You can access Swagger UI with the following URL:
http://localhost:8888/swagger
If you are prompted to Login screen, go ahead and login and re-launch the above URL in the same browser session again.
Integrate TestOptimal in your java project (Java /IDE Connector)
TestOptimal can be used in your testing project as a maven dependency.
 <dependency>
   <groupId>com.github.testoptimal</groupId>
   <artifactId>JavaConnector</artifactId>
   <version>1.0.4</version>
 </dependency>
You can build your model using POJO java classes and submit it to TestOptimal server to generate test cases from the model. The test cases are returned back to your java code for your further test case execution.
You can generate test cases for state model and data set (combinatorial testing).
See JavaConnector README for more details.
Integrate TestOptimal in your web project (javascript/node.js)
You may integrate your web project with TestOptimal using javascript library: TOServer.js.
For web/javascript, just add one of the following <script> to HEAD tag in your html page:
  <script src="http://[TestOptimal host:port]/agent/TOServer.js"></script>
  <script src="https://testoptimal.com/v6/agent/TOServer.js"></script>
For Node.js project, use following npm command to install TOServer.js package:
npm install @testoptimal/mbt
Connecting to TestOptimal Server
 TOSvr = new TOServer("http://localhost:8888");
 TOSvr.setDebugCB((msg)=> console.logMsg ("DEBUG: " + msg), 2);
 TOSvr.login("myUsername", "myPwd")
    .then(() => {
              console.logMsg("connected to TestOptimal server");
          }, (err) => {
              console.logMsg(err);
              alert("Connection error");
    });
State Model Sample Scripts
Creating State Model
var model = new Model ("VendingMachine");
var Welcome = model.addStateInitial("Welcome");
var Q1 = model.addState("25 cents");
var Q2 = model.addState("50 cents");
var Q3 = model.addState("75 cents");
var Q4 = model.addState("100 cents");
var ThankYou = model.addStateFinal("ThankYou");

Welcome.addTrans("add_quarter", Q1).addTrans("cancel", ThankYou);
Q1.addTrans("add_quarter", Q2).addTrans("cancel", ThankYou);
Q2.addTrans("add_quarter", Q3).addTrans("cancel", ThankYou);
Q3.addTrans("add_quarter", Q4).addTrans("cancel", ThankYou);
Q4.addTrans("select_drink", ThankYou).addTrans("cancel", ThankYou);

// TOSvr is the connection object created in Making Connection section above.
TOSvr.uploadModel(model).then (function(){alert("model uploaded");})
Generating Test Cases
TOSvr.genPaths("VendingMachine", "Optimal", 1000).then(printPaths);
function printPaths (sum) {
   console.logMsg(sum);
}
Opening Graphs
// graph types: model, sequence, msc and coverage
// except model graph, all other graphs are available for model execution.
var url = TOSvr.getGraphURL("VendingMachine", "model");
console.logMsg("model graph: " + url);
window.open(url, "ModelGraph");
Online MBT
 var execReq = {
	modelName: "DEMO_RemoteAgent",
	statDesc: "description",
	options: { "autoClose": false }
};
var agentID = "DEMO";
TOSvr.execModel(execReq).then((data) => {
	console.logMsg(data);
	console.logMsg("Registering agent " + agentID);
	TOSvr.regAgent(execReq.modelName, agentID).then(getNextCmd, errHandler);
});

function getNextCmd() {
   TOSvr.nextCmd(agentID, 2000).then(function(rmtCmd) {
	  if (rmtCmd && rmtCmd.cmd) {
		  var result = {
			result: "I don't know",
			reqTag: "DEMO",
			assertID: "DEMO-" + rmtCmd.cmd
		 }
		 console.logMsg("received cmd: " + rmtCmd.cmd);
		 console.logMsg("sending result: " + result.result);
		 TOSvr.setResult (agentID, result).then (function(ret) {
			setTimeout(getNextCmd, 1000);
		  }, errHandler);
	  }
	  else modelExecDone();
   }, errHandler);
}

function modelExecDone() {
   console.logMsg("Model execution completed");
}function errHandler (err) {
   console.log("errored");
   console.logMsg(err);
   TOSvr.stopModelExec(execReq.modelName);
}
Retrieve Execution Results
TOSvr.getSummary("DEMO_RemoteAgent").then(function(ret) {console.logMsg(ret);})
Combinatorial Model Sample Scripts
Create DataSet
  var ds = new DataSet("DemoDataSet");
  ds.addField ("F1", "text", ["aa","bbb"], "", false);
  ds.addField ("F2", "int", [1,2,3], "", false);
  TOSvr.uploadDataSet (ds).then(console.logMsg, console.logMsg);
Generate Test Cases
TOSvr.genDataTable("DemoDataSet", "pairWise").then(console.logMsg, console.logMsg);
Demo Web Client
You may try out above sample scripts with the web client bundled in TestOptimal installation:


